Quick start guide
This guide will show you how to install and set up RADKit Service and RADKit Client with the most commonly used options. If you are a Cisco customer looking to get support on a TAC case using RADKit, and you are not sure where to start, you are in the right place.
Downloading and installing RADKit
Please visit the downloads area and get the latest RADKit installer for your system (see Supported OSes & architectures for details):
OS/Arch |
File to download |
Detailed instructions |
|---|---|---|
Windows |
|
|
macOS |
|
|
macOS |
|
|
Linux |
|
Run the installer for your system and follow the prompts until the installation is complete.
A full RADKit installation contains both the Service and Client and takes up about 400MB of disk space. If an installer is not available for your OS/architecture (see Compatibility), please reach out to your Cisco TAC Engineer for assistance with setting up RADKit.
RADKit Service
Note
The very first time you start it, it can take a little while for RADKit Service to start (about 10 to 30 seconds depending on the speed of your system). Subsequent runs will be much faster.
Starting RADKit Service on Windows/macOS
Locate RADKit Service in your Start Menu (on Windows) or Applications folder (on macOS) and start it.
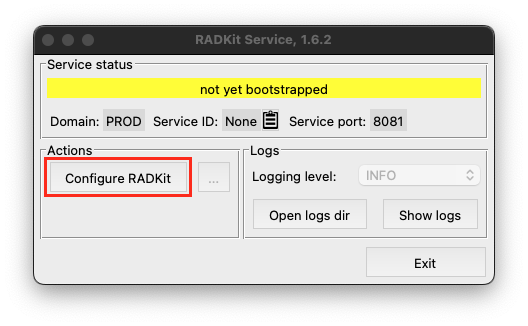
After startup is complete, you will see the RADKit Service GUI, a small control panel that allows you to monitor and control RADKit Service. Once the status changes to “not yet bootstrapped”, press “Configure RADKit” as shown on the screenshot:
Starting RADKit Service on Linux
If you performed a system-wide installation, make sure that RADKit Service is running by issuing
the command: sudo systemctl start radkit then point your browser to https://localhost:8081.
If you performed a single-user installation, run the command: ~/.local/radkit/bin/radkit-service run
and once you see output similar to the screenshot below, point your browser to https://localhost:8081.

Bootstrapping RADKit Service
Your browser will take you to the RADKit Service WebUI, a web-based management interface that allows you to manage RADKit Service. This is where you will perform all the subsequent steps in this document.
Note
Since RADKit Service starts up with a self-signed TLS certificate, you may get a warning from your
browser that the certificate is invalid. If you are indeed navigating to localhost on the
Service port that is indicated in the GUI or terminal output (8081 in the screenshot), you can
safely ignore the warning.

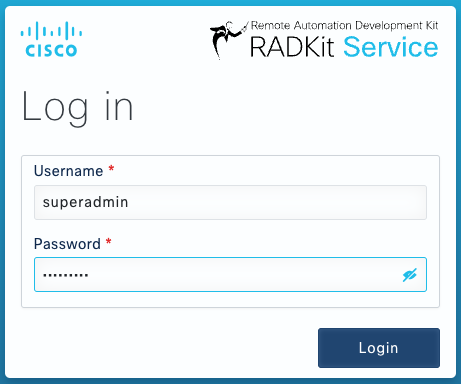
You first have to bootstrap the Service by creating a superadmin account. Choose a
password that complies with the password strength requirements displayed on the right.
Warning
The password for this account will be used to protect secrets such as private keys and device credentials; if you lose it, all secrets will be lost and RADKit Service will need to be reinitialized, so choose it carefully and write it down in a secure location. It can be changed later as needed.
After creating the superadmin account, use it to log in to the WebUI.
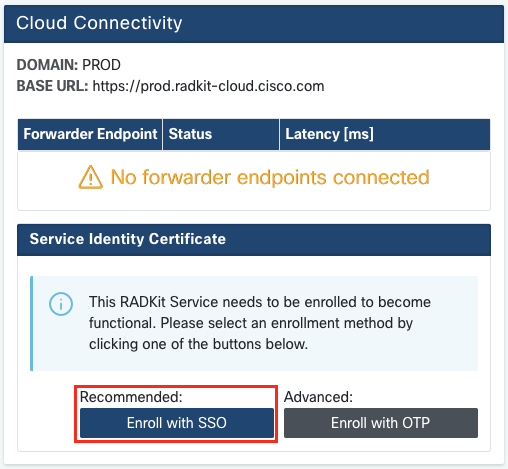
Enrolling RADKit Service
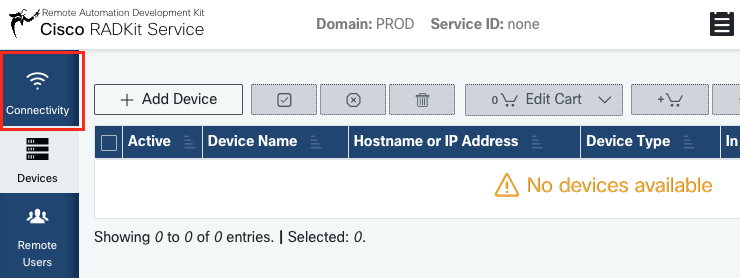
After logging in as superadmin, navigate to the “Connectivity” screen:
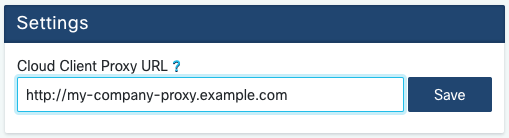
Optional: if your company uses an HTTP Proxy to connect to the public Internet, enter the URL to your proxy server in the “Cloud Client Proxy URL” field and click “Save”.
Note
Only Proxy URLs starting with http:// are supported; if your proxy requires authentication,
or it uses a different protocol, please refer to Proxy settings or ask your Cisco point
of contact for assistance.
Now you need to enroll the Service to let it connect to RADKit Cloud. This is done by logging in via the Service WebUI using your Cisco.com (CCO) account. Click “Enroll with SSO” to proceed.
Enter the email address corresponding to your Cisco.com (CCO) account in the email address field on step 2 and click “Submit”.
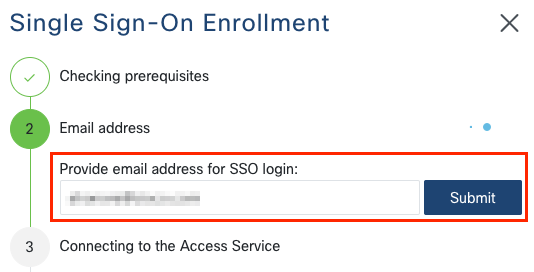
Warning
If you are already logged in to Cisco.com in this browser, for instance after downloading the RADKit installer, please make sure that the email address you enter in this field is the same as the one that is currently logged in. If you wish to register this RADKit Service to another CCO account, make sure to log out of Cisco.com first.
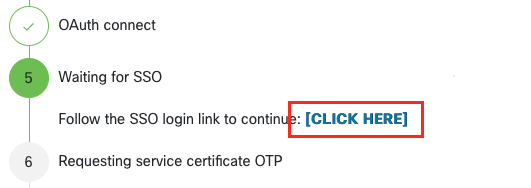
After RADKit Service connects to RADKit Cloud for authorization, it will show you a “CLICK HERE” link that will take you to the Cisco SSO server for authentication. Click the link to proceed; it will open in a new browser tab/window. Make sure to use the same email address to log in to SSO, as the one you entered in Step 2 above.
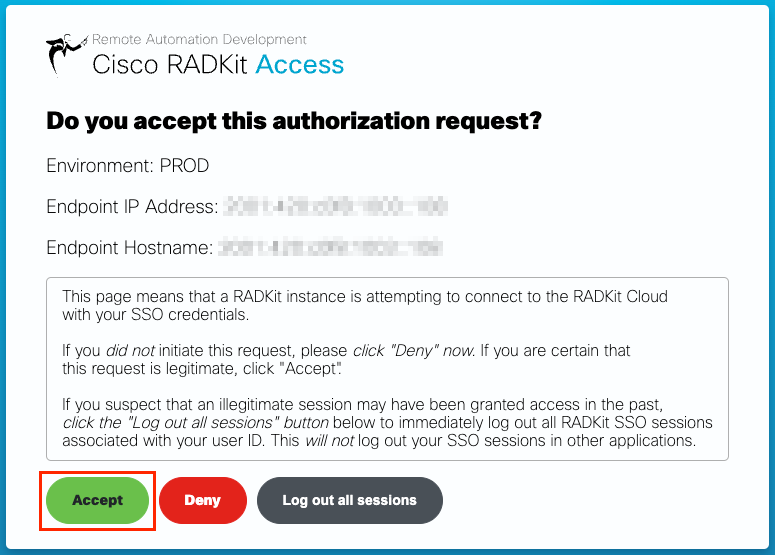
After SSO authentication is complete (or straight away, if you were already authenticated) you will be taken to a RADKit Access confirmation page. Read the information that is on the page and click “Accept” to authorize RADKit Service to enroll with your CCO account as the owner.
You will then get to a screen that says “Authentication result: Success”.
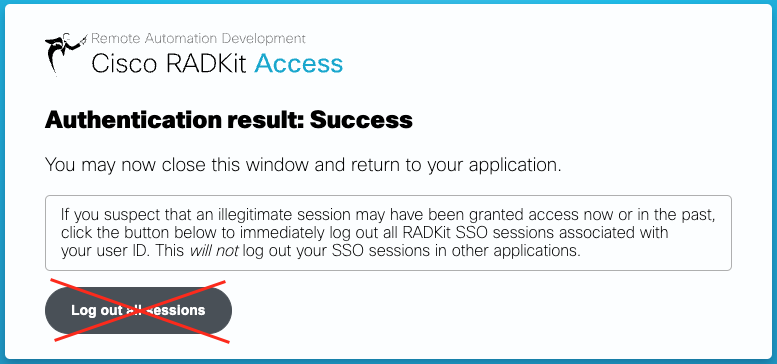
Do not click the “Log out all sessions” button; instead, simply close the SSO tab/window and
return to the RADKit Service WebUI, which should show “Service enrolled with the identity: …”.
The unique identifier that follows is your RADKit Service ID, also known as the Service Serial
Number. In the example screenshot, the Service ID is 9qq0-4h0r-kz5g; yours will be
different.
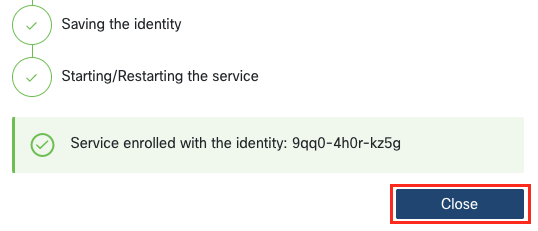
Click “Close” to close the dialog and return to the “Connectivity” screen.

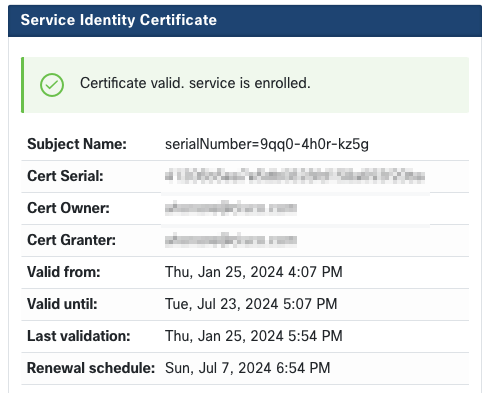
The Service ID is now shown at the top of the screen, and the status should show “CONNECTED” in both the WebUI and the RADKit GUI control panel. You can view the details of your Service’s identity certificate in the “Service Identity Certificate” section.
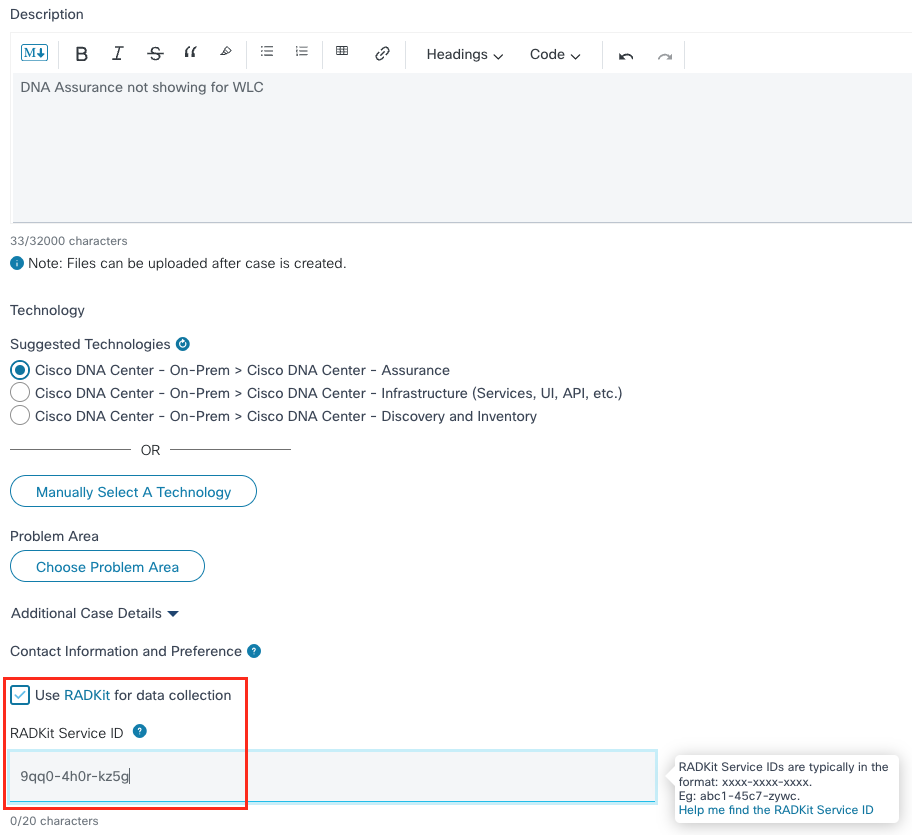
Communicating the Service ID
Your RADKit Service ID can now be communicated to your Cisco TAC Engineer. If you have not yet opened a TAC case, you will have the opportunity to mention “Use RADKit for data collection” in the Support Case Manager on Cisco.com:
Adding devices
Now it is time to add a device to your RADKit Service inventory. Navigate to the “Devices” screen:
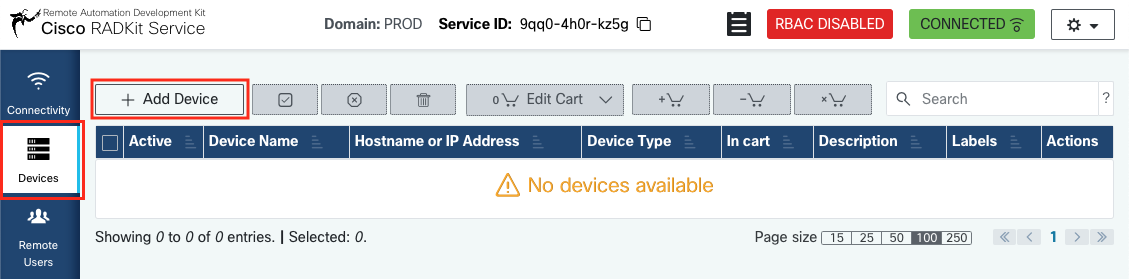
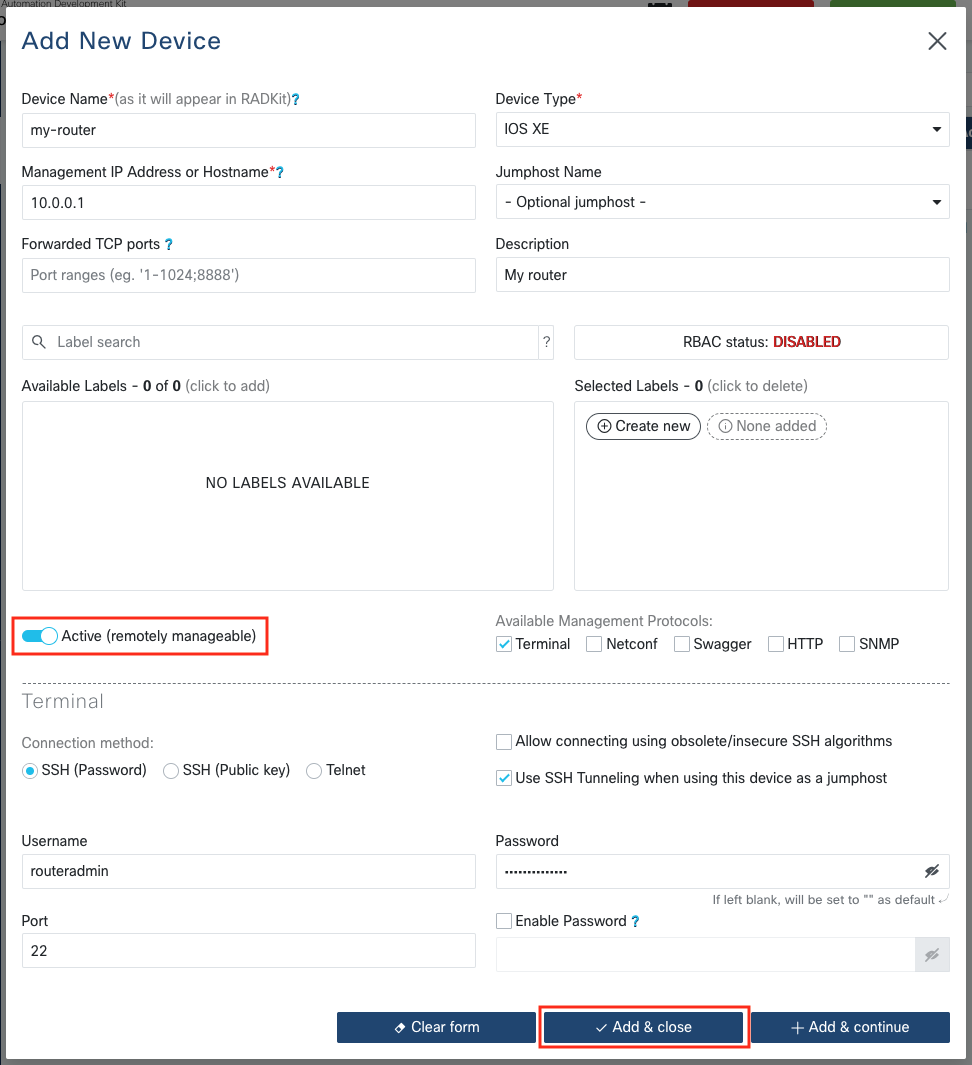
Create a new entry by clicking “Add Device”. Enter the IP address or hostname, select the device type, and provide details about the management protocols through which you would like to give access to this device. When done, click “Add & close” to go back to the Devices screen, or “Add & continue” to add another device.
In the example below, the device is an IOS-XE router that has Terminal settings configured for
accessing the CLI via SSH, with user routeradmin, password authentication, and without a
separate enable password.
The device is set to “Active (remotely manageable)”, i.e. it will be reachable remotely by authorized remote users. Devices can be deactivated at any time from the WebUI if remote access should no longer be authorized.
Note
For more information about supported management protocols, please ask your Cisco contact for assistance, or browse the RADKit documentation (see the Features section in particular).
Adding remote users
The last basic configuration step is to add your Cisco TAC Engineer to your RADKit Service. Navigate to the “Remote Users” screen:
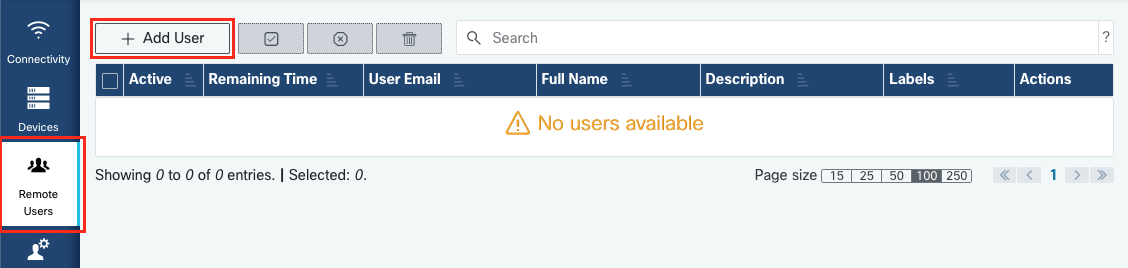
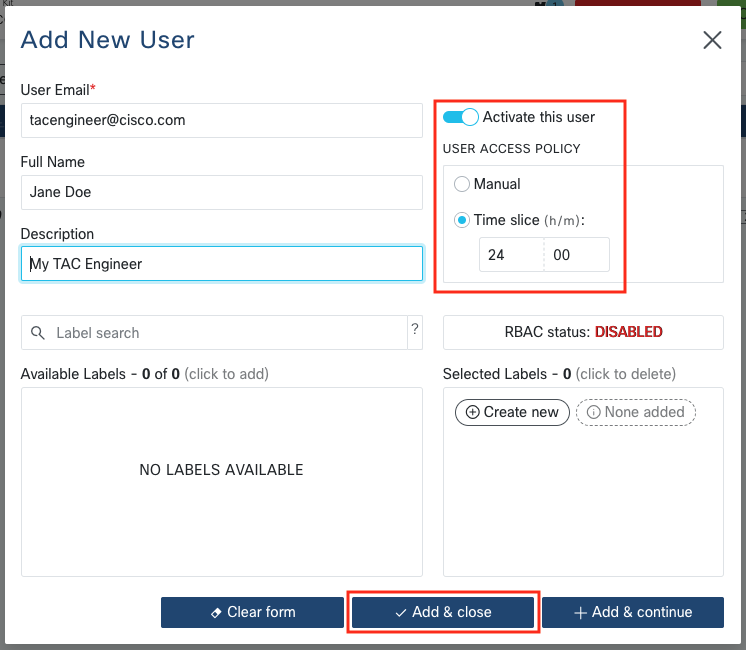
Create a new remote user by clicking “Add User”. Enter the TAC Engineer’s @cisco.com email
address (be careful about typos). Make sure to pay attention to the “Activate this user” checkbox
and the “Time slice” or “Manual” setting:
While the user is active, they have access to the configured devices through RADKit Service, provided that those devices are enabled and that the RBAC policy allows them to (in this example, an RBAC policy is not yet configured).
The time slice represents the amount of time after which the user will be automatically deactivated; in other words, a time slice represents a time-bound troubleshooting session. The user’s session can be extended up to the duration of the time slice for that user. If you prefer to manually activate/deactivate users, choose Manual instead.
Users can always be manually activated/deactivated, regardless of their having a time slice configured or not. When a user gets deactivated, all their sessions through RADKit Service are instantly disconnected.
When done, click “Add & close” to go back to the Remote Users screen, or “Add & continue” to add another user.
RADKit Client
RADKit Client is automatically installed together with RADKit Service when you use an installer. Depending on your use case, you may or may not need RADKit Client: if you are only using RADKit to provide remote access to Cisco TAC, you can skip this section entirely – only RADKit Service is required on your end; if, however, you would like to further explore the possibilities that RADKit offers, then read on.
Note
The very first time you start it, it can take a little while for RADKit Client to start (about 10 to 30 seconds depending on the speed of your system). Subsequent runs will be much faster.
Starting RADKit Client on Windows/macOS
Locate RADKit Client in your Start Menu (on Windows) or Applications folder (on macOS) and start it.
Starting RADKit Client on Linux
In a terminal, run the command: radkit-client (the command should be in your PATH
after the installation).
Authenticating
After startup is complete, you will see the RADKit Client terminal where commands can be entered as Python statements (this is called the “REPL”).
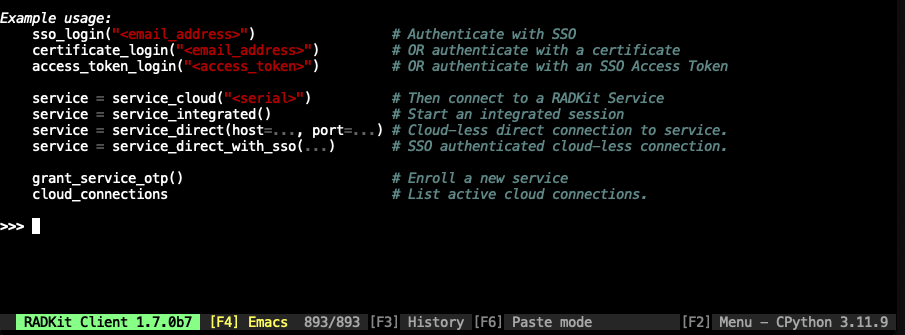
Use the sso_login method to log
a Client in to a cloud domain and
authenticate using your Cisco SSO account (replace myuserid@cisco.com with
the actual email address associated with your Cisco account):
>>> sso_login("myuserid@cisco.com")
A domain can be passed explicitly if a domain other than the default domain is desired:
>>> sso_login("myuserid@cisco.com", domain="PROD")
Note
Depending on your operating system, the SSO login page will directly open in your browser, or
you will be shown a URL that will take you to it. You can force the SSO URL to be displayed
on the screen instead of opened in a browser by adding open_browser=False:
>>> sso_login("myuserid@cisco.com", open_browser=False)

Please open the following link in a browser to authenticate:
  https://cloudsso.cisco.com/as/authorization.oauth2?response_type=code&client_id=radkit_access&redirect_uri=...
Either way, the command will pause and wait for you to complete the SSO login process.
After successfully logging in, the sso_login command will return a
Client object
that represents your authenticated session to the RADKit Cloud:
>>> client
[CONNECTED] Client(status='CONNECTED')
-----------------  ----------------------------------------------------
connected_domains  PROD (user@example.com; OIDC auth; authenticated )
services           not connected to any service
running_proxies    no local proxy running
-----------------  ----------------------------------------------------
 HINT:  use grant_service_otp('<service_owner_email>') to authorize provisioning of a RADKit Service
Connecting to a Service
To connect to a RADKit Service that is already enrolled, first get its serial
number, ensure that it is up and running, ensure that sso_login has been called, and then call
service_cloud():
>>> service = service_cloud("xxxx-yyyy-zzzz")
What’s next ?
For an overview of things you can do with the Client, go to Introduction to RADKit Client.
For a simplified Client CLI, check out the RADKit Network Console feature.
For advanced topics related to the Client, go to Advanced Client setup.