Terminal & SFTP/SCP
This page first explains how to set up RADKit Service to access devices over a terminal protocol, namely Telnet and SSH. Then, it goes over the different ways to establish and work with an SSH session, as well as how to transfer files to and from the device using the SFTP protocol.
Danger
It should be noted that even though RADKit supports both Telnet and SSH, Telnet is only supported for unauthenticated terminal server use cases for backward compatibility. Use of Telnet is highly discouraged since it’s insecure, and SSH should be used instead. This page will use SSH in all discussion and examples.
Note
Command execution over SSH from the RADKit Client is documented separately in the Command execution. The configuration steps on the RADKit Service side are the same as those outlined below.
Service configuration
Terminal configuration
Either add a new device, or edit an existing one and check the Terminal box.
The Terminal configuration section will appear:
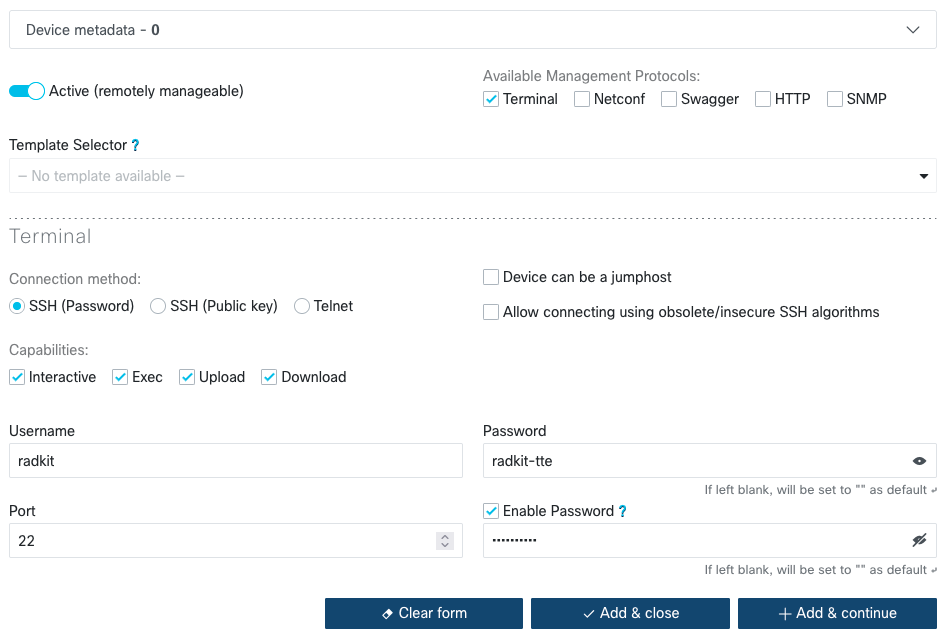
The Username, Password and Port inputs should be self-explanatory.
If a device marked as Device can be a jumphost then it can be used by RADkit Service as jumphost to other devices, but still need to be explicitly named as jumbhost on the target devices.
Capabilities provide more precise control over the SSH connection to the device. By default, Terminal access gives all capabilities to remote users, meaning they can Upload, Download, use the Exec() API, or log in interactively to the device.
For example, if you uncheck the “download” and “Upload” boxes, remote users will only trigger Exec() API and log in interactively. No uploads or downloads are allowed on the device.
Enable password
If the device requires an enable password to gain privileged access, check the
Enable Password box. This will allow you to enter a separate password for enable.
There are 3 possibilities here depending on what the device expects:
If the
Enable Passwordbox is not checked, theenablecommand will not be issued after logging in to the device over the terminal connection.If the
Enable Passwordbox is checked and a non-emptyenablepassword is configured, theenablecommand will be issued after logging in to the device over the terminal connection, and the configuredenablepassword will be provided if the device prompts for a password.If the
Enable Passwordbox is checked but the actual password field is left empty, theenablecommand will be issued after logging in to the device over the terminal connection, and an empty password will be provided if the device prompts for a password.
Device type
The Enable Password fields described above are shown in the Service WebUI for all device
types (this will be changed in a future release), but the enable command only gets sent
to the device when it makes sense (IOS XE, ASA).
Additionally, some specific commands are sent to the device depending on the configured device type, in order to prepare the session for reading and writing:
For
IOS XE(which covers both IOS, IOS XE),IOS XRandNXOS, the following commands are sent after connecting (and afterenableif applicable):terminal length 0terminal width 0
For
ASA, the following commands are sent after connecting (and afterenableif applicable):terminal pager 0
Warning
The pager is disabled so that it won’t interfere with automated read/write operations and execution of commands. This means that if you want to use the session interactively, you may have to manually re-enable the pager if you intend to issue commands that produce very long outputs.
Client operation
Interactive
The simplest way to connect to a device over SSH is to use the
Device.interactive()
method, which is a wrapper that creates an SSH
session to the device then attaches it to the current terminal:
>>> csr1 = service.inventory['csr1']
>>> csr1.interactive()
16:26:06.225Z INFO  | Starting interactive session (will be closed when detached)

Attaching to  csr1  ...
    Type:  ~.  to terminate.
           ~?  for other shortcuts.
When using nested SSH sessions, add an extra  ~  per level of nesting.

terminal length 0
csr1#terminal width 0
csr1#
csr1#show clock
12:26:18.370 EDT Fri Aug 12 2022
csr1#
csr1# !!! now hit ~. !!!
csr1#
16:26:26.460Z INFO  | Interactive session closed
To disconnect the interactive session, hit the ~. key sequence or terminate using
the exit command (or its equivalent, depending on the remote platform/OS):
csr1#exit
detached
16:29:52.593Z INFO  | Interactive session closed
Note
Invoking interactive() again on the same device does not reuse the previous
session; it creates a new SSH session every time and closes it when detaching.
Opening and closing an SSH session
What interactive() does behind the scenes is equivalent to:
>>> ses = csr1.terminal().wait()
>>> ses.attach()
>>> ses.close()
The ses variable above contains a radkit_client.sync.terminal.connection.InteractiveConnection
object that is returned by Device.terminal():
# This waits for the session object to open
>>> ses = csr1.terminal().wait()

>>> ses
<radkit_client.sync.terminal.connection.InteractiveConnection object at 0x1063292e0>

-----------  --------------
serial       xxxx-yyyy-zzzz
device_name  csr1
term         xterm-256color
term_size    157x38
closed       False
-----------  --------------
To attach the terminal to the newly opened session, use
InteractiveConnection.attach():
>>> ses.attach()

Attaching to  csr1  ...
    Type:  ~.  to detach.
            ~?  for other shortcuts.
When using nested SSH sessions, add an extra  ~  per level of nesting.

terminal length 0
csr1#terminal width 0
csr1#
csr1#exit
detached
The difference between attach() and interactive() is that after detaching:
for
attach()the session is not immediately closed. Instead, it remains open and can be re-attached to or read/written from;for
interactive()the session is terminated.
All active sessions are listed under Device.sessions
with their status, session ID and protocol type:
>>> csr1.sessions
<radkit_client.sync.state.SessionsDict object at 0x10809cae0>

Active Session objects for device: csr1

key    serial          device_name    term            term_size    closed
-----  --------------  -------------  --------------  -----------  --------
0      xxxx-yyyy-zzzz  csr1           xterm-256color  157x38       True
Note
This table lists all possible session types, not only SSH. At the time of writing this doc, the possible session types are “interactive terminal”, “read file” and “write file”, all of which are documented on this page.
Once the session is no longer needed, it can be closed using
InteractiveConnection.close()
or InteractiveConnection.terminate():
>>> csr1.sessions
<radkit_client.sync.state.SessionsDict object at 0x10d4eaae0>

Active Session objects for device: csr1

key    serial          device_name    term            term_size    closed
-----  --------------  -------------  --------------  -----------  --------
0      xxxx-yyyy-zzzz  csr1           xterm-256color  127x38       False


>>> ses.close()

>>> ses
<radkit_client.sync.terminal.connection.InteractiveConnection object at 0x10e1e28b0>

-----------  --------------
serial       xxxx-yyyy-zzzz
device_name  csr1
term         xterm-256color
term_size    127x38
closed       True
-----------  --------------
Reading and writing over terminal sessions
It is also possible to read and write on an active SSH session. I/O is done using the
InteractiveConnection.write(),
InteractiveConnection.read() and
InteractiveConnection.readline()
methods, which all deal with bytes.
Note
Python 3 uses Unicode strings
natively. In order to read and write to an SSH session, we must convert strings
to/from bytes using the str.encode() and bytes.decode() methods, which
use the UTF-8 encoding by default.
write
To write to the session, use
InteractiveConnection.write().
For example, to write a newline to a terminal session:
# Writing a Unicode string is not allowed
>>> ses = csr1.terminal().wait()

>>> ses.write("\n")
Traceback (most recent call last):
    <traceback content omitted for brevity>
    encoded = binascii.b2a_base64(s, newline=False)
TypeError: a bytes-like object is required, not 'str'

a bytes-like object is required, not 'str'

# Either encode an str object...
>>> ses.write("\n".encode())

# ...or use a literal bytes value (prefix the quoted string with a 'b')
>>> ses.write(b"\n")
readline
To read a whole line from the session, use
InteractiveConnection.readline([timeout])
which blocks until a whole line is available, then returns it. If a timeout value is specified
(float, in seconds; default: no timeout, block forever) and a timeout occurs, then
asyncio.exceptions.TimeoutError is raised.
# readline() without timeout
>>> ses.readline()
b"\r\n"

# readline() with timeout
>>> ses.readline(timeout=2)
b'csr1#\r\n'
>>> ses.readline(timeout=2)
<traceback content omitted for brevity>
    raise exceptions.TimeoutError() from exc
asyncio.exceptions.TimeoutError
read
Another option is to use
InteractiveConnection.read([n], [timeout])
where n is the number of bytes to read (int, default: -1 = all bytes until EOF).
If a timeout value is specified
(float, in seconds; default: no timeout, block forever) and a timeout occurs, then
asyncio.exceptions.TimeoutError is raised.
# Simple read() example
>>> ses.read(-1, timeout=None)
b'csr1#terminal width 0\r\ncsr1#show clock\r\n13:06:29.196 EDT Mon Aug 15 2022\r\ncsr1#exit\r\n'

# Run "show clock" and capture the output
>>> ses = csr1.terminal().wait()
>>> cmd = "show clock\n" + "exit\n"
>>> ses.write(cmd.encode())
>>> out = ses.read().decode()
>>> out | print
terminal length 0
csr1#terminal width 0
csr1#show clock
13:08:49.030 EDT Mon Aug 15 2022
csr1#exit
It is important to note a few things in this example:
the command must be followed by
\n(carriage return, as if the user had hit Enter);it must be converted from Unicode to
bytesusingencode();the output must be converted from
bytesto Unicode usingdecode();the session needs to be closed after the command, because
read(n=-1)waits forEOF;we force
EOFfrom the terminal session by simply sendingexit.
There are also methods like:
InteractiveConnection.readexactly()Reads the exact specified number of bytes.
InteractiveConnection.readuntil()Reads data until a given separator is found.
InteractiveConnection.readuntil_regex()Reads data until a given regular expression matches.
InteractiveConnection.readuntil_timeout()Keep reading data until we are not getting any more data during a time interval.
Warning
It can be tricky to keep track of the exact state of the prompt on the other side;
for grabbing regular command output, you should favor
device.Device.exec() (see Command execution for details).
Reading/writing is more useful for gathering ongoing outputs such as logs, or
very large outputs such as packet traces.
Warning
Always make sure to close() your SSH sessions in a timely manner, as those will
consume a VTY line on the remote device while it remains open. If there is a limit to the
number of VTYs on the device, this may prevent others from accessing it.
exec
The InteractiveConnection.exec() method can
be used to perform command execution on an open terminal session (similar to
Command execution).
>>> ses = csr1.terminal().wait()
>>> cmd = ses.exec("show clock")
ExecSequence
An ExecSequence is a declarative definition of an execution flow that
can be performed on an terminal session, either in RADKit Client, or it can be sent to
RADKit Service for execution. See ExecSequence for more information.
Transferring a file over SFTP/SCP
Note
RADKit supports SFTP and SCP as SSH-based methods to transfer files to and from
devices. All the examples shown below are based on SFTP; to use SCP
instead, just replace sftp with scp in the API method names (e.g.
sftp_download_to_file becomes scp_download_to_file).
Warning
SCP is a legacy protocol, that has been replaced by SFTP for the
majority of SSH servers. Use of SCP may be necessary for servers that do
not implement SFTP. Remember that the scp command line utility from
OpenSSH uses (by default) SFTP under the hood instead of SCP.
To download or upload a file over SFTP, use
Device.sftp_download_to_file()
and Device.sftp_upload_from_file().
Those methods take a local_path
and a remote_path argument and return a
radkit_client.sync.terminal.connection.FileReadConnection
and a radkit_client.sync.terminal.connection.FileWriteConnection
session object, respectively.
>>> ses = csr1.sftp_download_to_file(remote_path="binary_trace_metadata.1619535782.tar.gz", local_path="btrace_meta.gz")
>>>
>>> ses
[DOWNLOADING] <radkit_client.sync.terminal.connection.FileReadConnection object at 0x109dd8070>

-----------------  ---------------------------------------
serial             xxxx-yyyy-zzzz
device_name        csr1
chmod              C0644
size               22396807
remote_path        binary_trace_metadata.1619535782.tar.gz
local_path         btrace_meta.gz
bytes_written      0
bytes_read         11771904
connection_result  connection succeeded
transfer_result    in progress
-----------------  ---------------------------------------


17:19:02.887Z INFO  | download complete [local_path='btrace_meta.gz' bytes_read=22396807]
The session object can be waited for using .wait_closed(), or can display a progress
bar using .show_progress(). You can interrupt the progress bar display with Control-C
without interrupting the transfer, which continues in the background until it either
completes, or is aborted by calling .close() on the session object.
>>> ses = csr1.sftp_download_to_file(remote_path="binary_trace_metadata.1619535782.tar.gz", local_path="btrace_meta.gz")

>>> ses.show_progress()
32277 kbps  55.3% [============================================>               ] 12394496/22396807 eta [00:01]
17:27:04.184Z WARNI | show_progress() has been interrupted by keyboard, transfer is still done in background, use .close() method to stop it

>>> ses.wait_closed() # or ses.close() to abort
17:27:06.698Z INFO  | download complete [local_path='btrace_meta.gz' size=22396807]
>>> ses = csr1.sftp_upload_from_file(remote_path="btrace_meta.gz", local_path="binary_trace_metadata.1619535782.tar.gz")

>>> ses.show_progress()
32277 kbps  55.3% [============================================>               ] 12394496/22396807 eta [00:01]
17:28:04.184Z WARNI | show_progress() has been interrupted by keyboard, transfer is still done in background, use .close() method to stop it

>>> ses.wait_closed() # or ses.close() to abort
17:28:06.698Z INFO  | upload complete [local_path='binary_trace_metadata.1619535782.tar.gz' bytes_written=22396807]
Reading and writing over SFTP/SCP
Note
RADKit supports SFTP and SCP as SSH-based methods to transfer data to and from
devices. All the examples shown below are based on SFTP; to use SCP
instead, just replace sftp with scp in the API method names (e.g.
sftp_download_to_stream becomes scp_download_to_stream).
Warning
SCP is a legacy protocol, that has been replaced by SFTP for the
majority of SSH servers. Use of SCP may be necessary for servers that do
not implement SFTP. Remember that the scp command line utility from
OpenSSH uses (by default) SFTP under the hood instead of SCP.
It is possible to read/write on an SFTP session instead of transferring to/from a
local file, by using
Device.sftp_download_to_stream()
and
Device.sftp_upload_from_stream().
The returned session objects present the same read/write methods as the terminal session object
described in the first part of this document:
>>> ses = csr1.sftp_download_to_stream(remote_path="running_conf.txt")

>>> ses
[CONNECTED] <radkit_client.sync.terminal.connection.FileReadConnection object at 0x10889c850>

-----------------  --------------------
serial             xxxx-yyyy-zzzz
device_name        csr1
chmod              644
size               28090
remote_path        running_conf.txt
local_path         None
bytes_written      0
bytes_read         0
connection_result  connection succeeded
transfer_result    n/a
-----------------  --------------------

>>>
>>> ses.read(n=40).decode()
'Building configuration...\n\nCurrent confi'
>>>
>>> ses.close()
>>> ses = csr1.sftp_upload_from_stream(remote_path="running_conf.txt", size=22)

>>> ses
[CONNECTED] <radkit_client.sync.terminal.connection.FileWriteConnection object at 0x12654ec50>

-----------------  --------------------
serial             xxxx-yyyy-zzzz
device_name        csr1
chmod              644
size               22
remote_path        running_conf.txt
local_path         None
bytes_written      0
bytes_read         0
connection_result  connection succeeded
transfer_result    n/a
-----------------  --------------------

>>>
>>> ses.write(b"Building configuration")
>>>
>>> ses.wait_closed() # we can wait till the upload will be finished or we can abort by .close()
Bidirectional socket to SSH session
To allow integration with third party libraries like pexpect the SSH session can be
exposed as a socket. To do that you need to call the
TerminalConnection.attach_socket()
method; it will return a SocketForwarder object with a socket attribute that returns
a bidirectional socket bound to the SSH session:
>>> ses = csr1.terminal().wait()

>>> socket = ses.attach_socket()

>>> socket
[RUNNING] <radkit_client.sync.terminal.socket_forwarding.SocketForwarder object {device_name='csr1', status='RUNNING'} at 0x10a731e20>

-----------  -----------------------------------------------------------------------------------------
status       RUNNING
device_name  csr1
socket       <socket.socket fd=13, family=AddressFamily.AF_UNIX, type=SocketKind.SOCK_STREAM, proto=0>
exception    None
-----------  -----------------------------------------------------------------------------------------
Warning
When a socket is attached to an SSH session, all other I/O operations like read() or
write() over that SSH session are forbidden.
To detach the socket, you need to either call
TerminalConnection.detach_socket()
or stop the socket:
>>> ses.detach_socket()
# or
>>> socket.stop()
Integration with pexpect
The pexpect library (expect for Python: https://pexpect.readthedocs.io/)
supports I/O on file descriptors. To connect pexpect to a terminal session
in RADKit Client, first attach a socket to the session as described above, then
pass the socket to pexpect.socket_pexpect.SocketSpawn:
Using SocketForwarder.spawn_pexpect():
>>> terminal = device.terminal().wait()
>>> forwarder = terminal.attach_socket()
>>> child = forwarder.spawn_pexpect()
Using SocketSpawn:
>>> from pexpect.socket_pexpect import SocketSpawn
>>> terminal = device.terminal().wait()
>>> forwarder = terminal.attach_socket()
>>> child = SocketSpawn(forwarder.socket)
Using fdspawn (does not work on windows):
>>> from pexpect.fdpexpect import fdspawn
>>> terminal = device.terminal().wait()
>>> forwarder = terminal.attach_socket()
>>> child = fdspawn(forwarder.socket.fileno())