Port forwarding, SOCKS5 & HTTP proxy
In addition to device access relayed through the Service, RADKit can also provide direct access to TCP ports on a device through either Port Forwarding or SOCKS5/HTTP proxy. This is helpful for certain services that do not run natively through the connector, e.g., WebUI access to a SD-WAN vManage controller or an ISE appliance. This page describes how to achieve such access with Port Forwarding, SOCKS5 proxy and HTTP proxy.
Known limitations:
The
jumphostin device setting is ignored in port forwarding. It means that port forwarding will be established directly to the device host even whenjumphostis specified. This may change in a future release.The SOCKS5 proxy does not resolve any domain names that do not follow the
<device_name>.<service_serial>.proxypattern. It means that if the page contains absolute URLs that are pointing to external JS, CSS, images, etc. accessible only from the device’s local network, those will not be resolved.The SOCKS5 and HTTP proxies cap concurrent connections at
max_connections(default:50). When the cap is reached, the SOCKS5 proxy silently closes additional incoming connections at the TCP layer (the SOCKS5 protocol has no over-capacity response code), while the HTTP proxy replies withHTTP 503 Service Unavailableand aRetry-After: 1header. Passmax_connections=Noneto disable the cap, or raise the value for high-concurrency workloads.Port forwarders, the SOCKS5 proxy and the HTTP proxy require an explicit local port; passing
local_port=0raisesValueError.
Service configuration
A prerequisite for port forwarding is setting up port forwarding capabilities in RADKit Service. By default, port forwarding is not allowed. It is necessary to explicitly add individual ports or port ranges that are meant to be accessible on a per-device basis.
The list of forwarded TCP ports follows this syntax:
an empty field means that port forwarding is disallowed for this particular device;
a single port is defined as an integer:
8000,8080etc.port ranges can be defined as integers separated by a dash:
1-1024,1000-2000etc.multiple entries are separated by a semicolon:
8000;1-1024;8080;1050-2000
The forwarded TCP ports can be configured when adding or editing a device in the RADKit Service WebUI:

Client operation
Port forwarding
The port forwarding feature allows you to bridge connections from a local port on the host running the RADKit Client to a destination port on a device behind the RADKit Service.
Danger
Exposed local ports are unprotected (there is no way to add an authentication layer, as
these are raw TCP sockets). Please use with caution. It is recommended to always restrict
the local address to localhost, to avoid using this feature on shared hosts, and to
stop the port forwarding as soon as it is no longer needed.
Starting port forwarders
To start port forwarding, use the
Device.forward_tcp_port()
method which returns a radkit_client.sync.port_forwarding.PortForwarder object:
>>> port_forwarder = csr1.forward_tcp_port(local_port=4443, destination_port=443)

>>> port_forwarder.status
<PortForwarderStatus.RUNNING: 'RUNNING'>
The forwarded port can then be accessed on localhost:
$ openssl s_client -showcerts -connect localhost:4443
CONNECTED(00000005)
...
Note
In the case of port forwarding, if credentials are required in order to access the service on the forwarded port, those credentials will have to be shared with the user behind the RADKit Client. Even if the RADKit Service has correct device credentials configured for the forwarded protocol, it cannot inject those credentials - the TCP connection is between the Client and the device. Temporary credentials will have to be shared set up on the device and shared with the user behind the RADKit Client for the duration of the troubleshooting session.
Monitoring port forwarders
There are several ways to check the state and statistics for active port forwarders:
Via the port forwarder object itself:
>>> port_forwarder
[RUNNING] <radkit_client.sync.port_forwarding.TCPPortForwarder object at 0x1150a52e0>

----------------  --------------
status            RUNNING
serial            xxxx-yyyy-zzzz
device_name       csr1
local_port        4443
destination_port  443
#active           0
#failed           0
#closed           0
#total            0
bytes up          0
bytes down        0
exception         None
----------------  --------------
At the
Device,ServiceorClientlevel, to see all port forwarders created for a given object:>>> csr1.port_forwards <radkit_client.sync.state.TCPPortForwardsDict object at 0x1139164f0> Port forwards for device: csr1 key status serial device_name local_port destination_port #active #failed #closed #total bytes up bytes down exception ----- -------- -------------- ------------- ------------ ------------------ --------- --------- --------- -------- ---------- ------------ ----------- 0 STOPPED xxxx-yyyy-zzzz csr1 4443 443 0 0 3 3 6331 4909 None 1 RUNNING xxxx-yyyy-zzzz csr1 4443 443 0 0 0 0 0 0 None >>> service.port_forwards ... >>> client.port_forwards ...
For deeper insights you can check each individual connection made through the port forwarder:
To list all of the connections:
>>> port_forwarder.connections
<radkit_client.sync.port_forwarding.Connections object at 0x10bd372b0>
Tunneled connections made at localhost:4443 to dev:8443:

key    uuid                                  endpoint   status    opened                      closed                      exception
-----  ------------------------------------  ---------  --------  --------------------------  --------------------------  --------------------------------------------------------------------------------
0      8904bb0c-f75a-48ce-a4cd-3cb693a21a5e  dev:8443   FAILED    2023-02-15 09:52:36.323209  2023-02-15 09:52:37.008297  Performing action failed: Tunnel fail error: OS error: Connection refused [de...
1      604771f5-64fc-426f-9ae0-1f9e95845644  dev:8443   FAILED    2023-02-15 09:52:36.324510  2023-02-15 09:52:37.008004  Performing action failed: Tunnel fail error: OS error: Connection refused [de...
To check details of a particular connection:
>>> port_forwarder.connections[0]
<radkit_client.async_.port_forwarding.Connection object at 0x10b6b7550>

---------  --------------------------------------------------------------------------------
uuid       8904bb0c-f75a-48ce-a4cd-3cb693a21a5e
endpoint   dev:8443
status     FAILED
opened     2023-02-15 09:52:36.323209
closed     2023-02-15 09:52:37.008297
exception  Performing action failed: Tunnel fail error: OS error: Connection refused [de...
---------  --------------------------------------------------------------------------------
Controlling port forwarders
Every port forwarder can be in one of three states, from
radkit_client.sync.port_forwarding.PortForwarderStatus:
RUNNING- port forwarding is activeSTOPPED- forwarding stopped, can be resumed at any timeFAILED- there was an exception
The current status can be checked through the
PortForwarder.status attribute.
To stop or start a port forwarder, use
PortForwarder.start()
or PortForwarder.stop().
>>> port_forwarder.status
<PortForwarderStatus.RUNNING: 'RUNNING'>

>>> port_forwarder.stop()

>>> port_forwarder.status
<PortForwarderStatus.STOPPED: 'STOPPED'>
SOCKS5 proxy
RADKit also provides a SOCKS5 proxy service that allows you to connect a web browser or any other compatible software to a device on a given port (or set of ports) at runtime. The SOCKS proxy takes advantage of both RADKit’s TCP tunneling and HTTP proxying capabilities.
The proxy server can be started on the Client by calling
Client.start_socks_proxy(),
which returns a
ProxyPortForwarder.
Pass the proxy port and proxy credentials as arguments:
>>> socks_proxy = client.start_socks_proxy(4000, username="radkit-user", password="sEcret!123")

>>> socks_proxy
[RUNNING] <radkit_client.sync.port_forwarding.ProxyPortForwarder object at 0x10666bb20>

--------------  --------
status          RUNNING
local_port      4000
#active         0
#failed         0
#closed         0
#total          0
protocol        SOCKS_V5
bytes up        0
bytes down      0
exception       None
--------------  --------
Danger
You can also create an unprotected SOCKS5 proxy, but it is highly recommended that you
enable authentication for production use cases. In the following example, we will enable
SOCKS5 proxy without requiring proxy credentials, but limit proxy access with the
local_address parameter set to localhost only (the default):
>>> socks_proxy = client.start_socks_proxy(4000, local_address="localhost")
Note
Some browsers do not support SOCKS authentication. In that case, restrict to localhost.
The SOCKS proxy resolves FQDNs that match any of these patterns:
<device_name>.<service_serial>.tcp.proxy.<device_name>.<service_serial>.http.proxy.index.proxy(overview of all services).
The TCP proxying will tunnel direct TCP connections to the actual device on the given port number. This means it will support any protocol on top of TCP. It also means that if a TLS certificate is presented, it’s the device itself that will terminate the TLS connection. The RADKit service won’t interfere and establish any authentication to the device.
The HTTP proxying on the other hand, uses the HTTP forwarding capabilities from RADKit. This means that for known device types, the RADKit service will intercept the connections and establish an authenticated session. HTTP proxying is only made available on port 80 and 443. When port 443 (HTTPS) is used, the TLS certificate that is presented is a local certificate from radkit_client; not a certificate from the device. Any incoming HTTP request here is handled by the SOCKS proxy and turned into a RADKit HTTP request.
Warning
DNS delegation of the .proxy TLD to the SOCKS proxy must be enabled in the browser.
Without it, device/service names will not resolve correctly. Make sure to exclude any normal
DNS domains that should not be proxied.
Go to http://index.proxy or https://index.proxy to see a web interface with an overview of all services.
Example URL to access device test-vm on Service xxxx-yyyy-zzzz:
http://test-vm.xxxx-yyyy-zzzz.tcp.proxy/
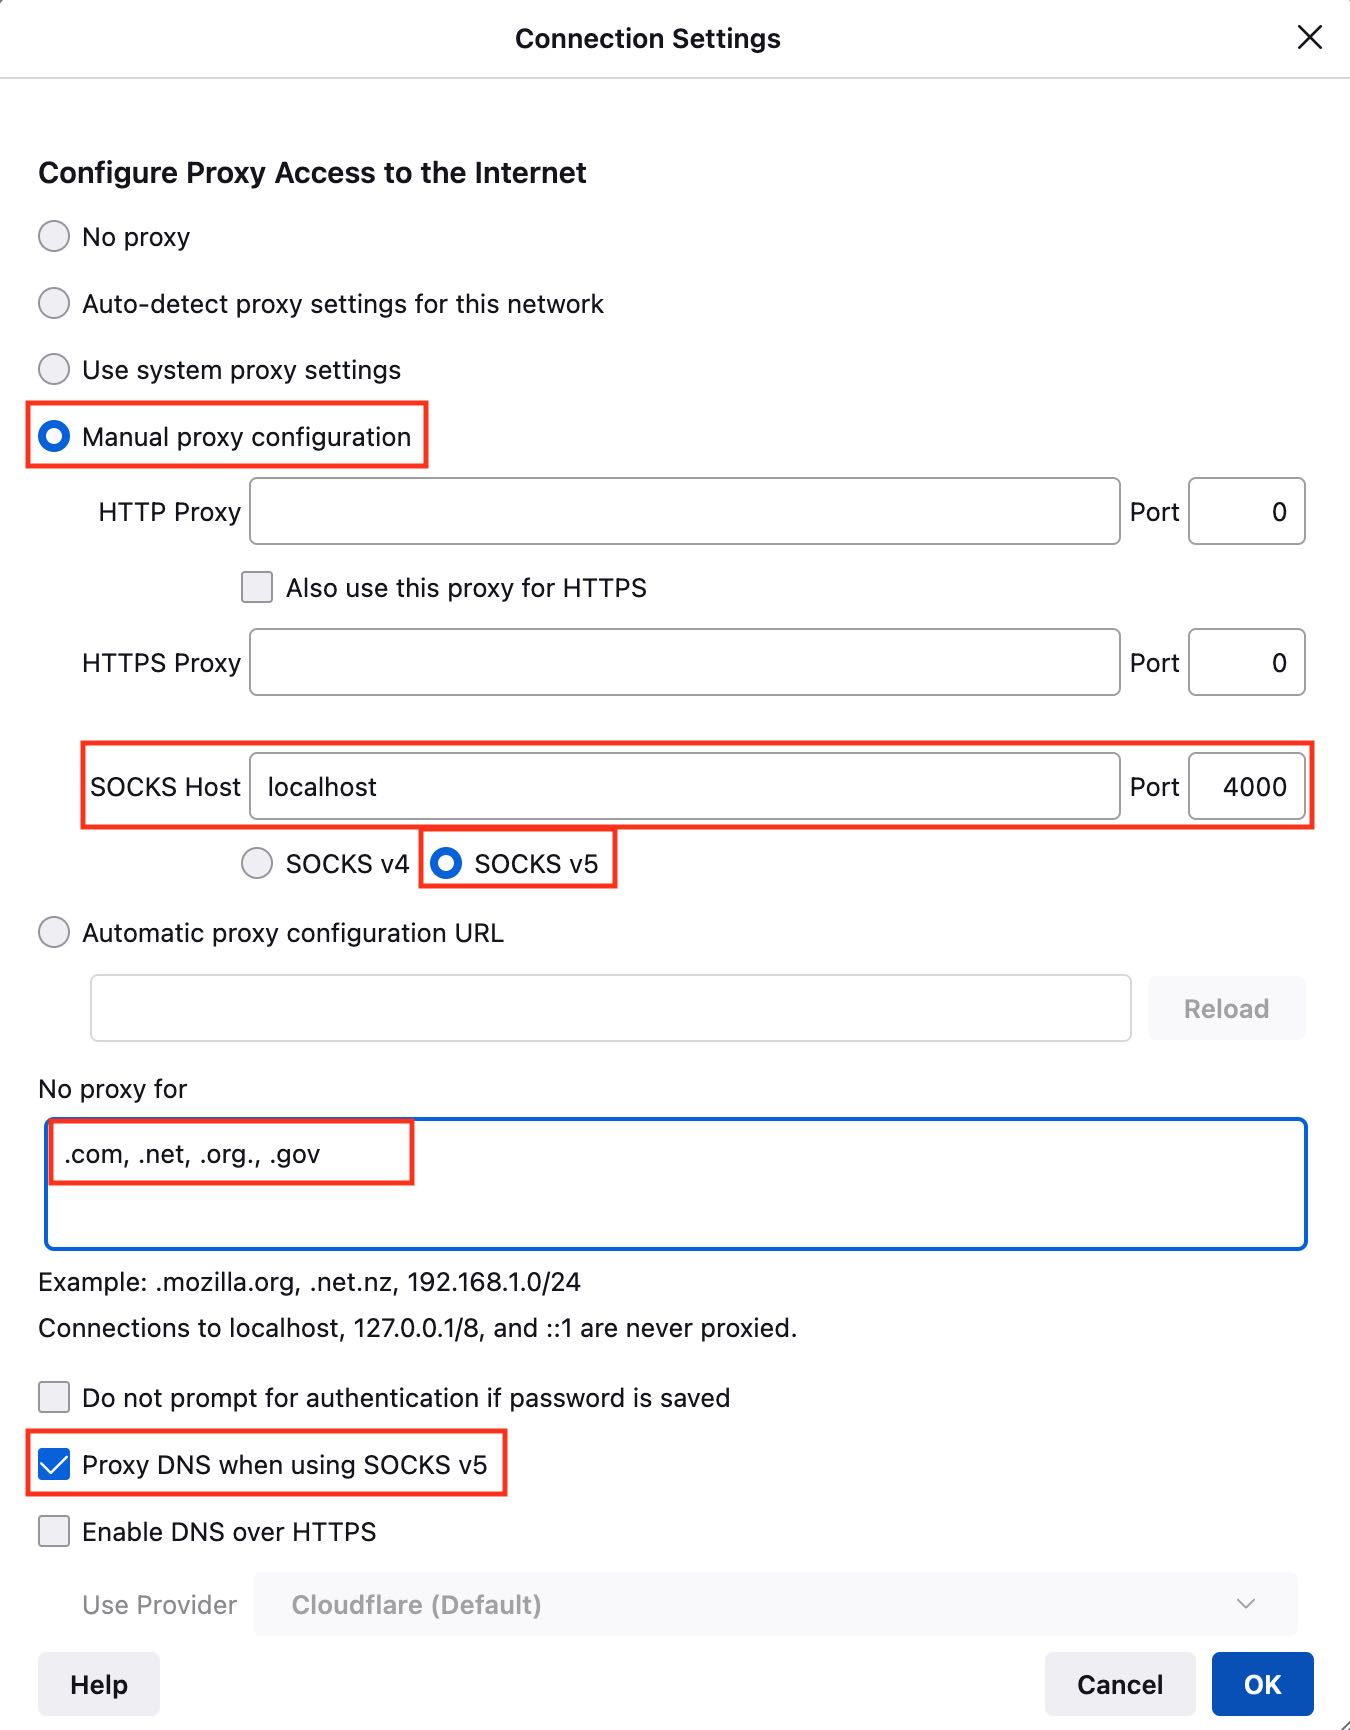
Example browser network settings with SOCKS5 proxy enabled:
Example 1 (Firefox - manual):
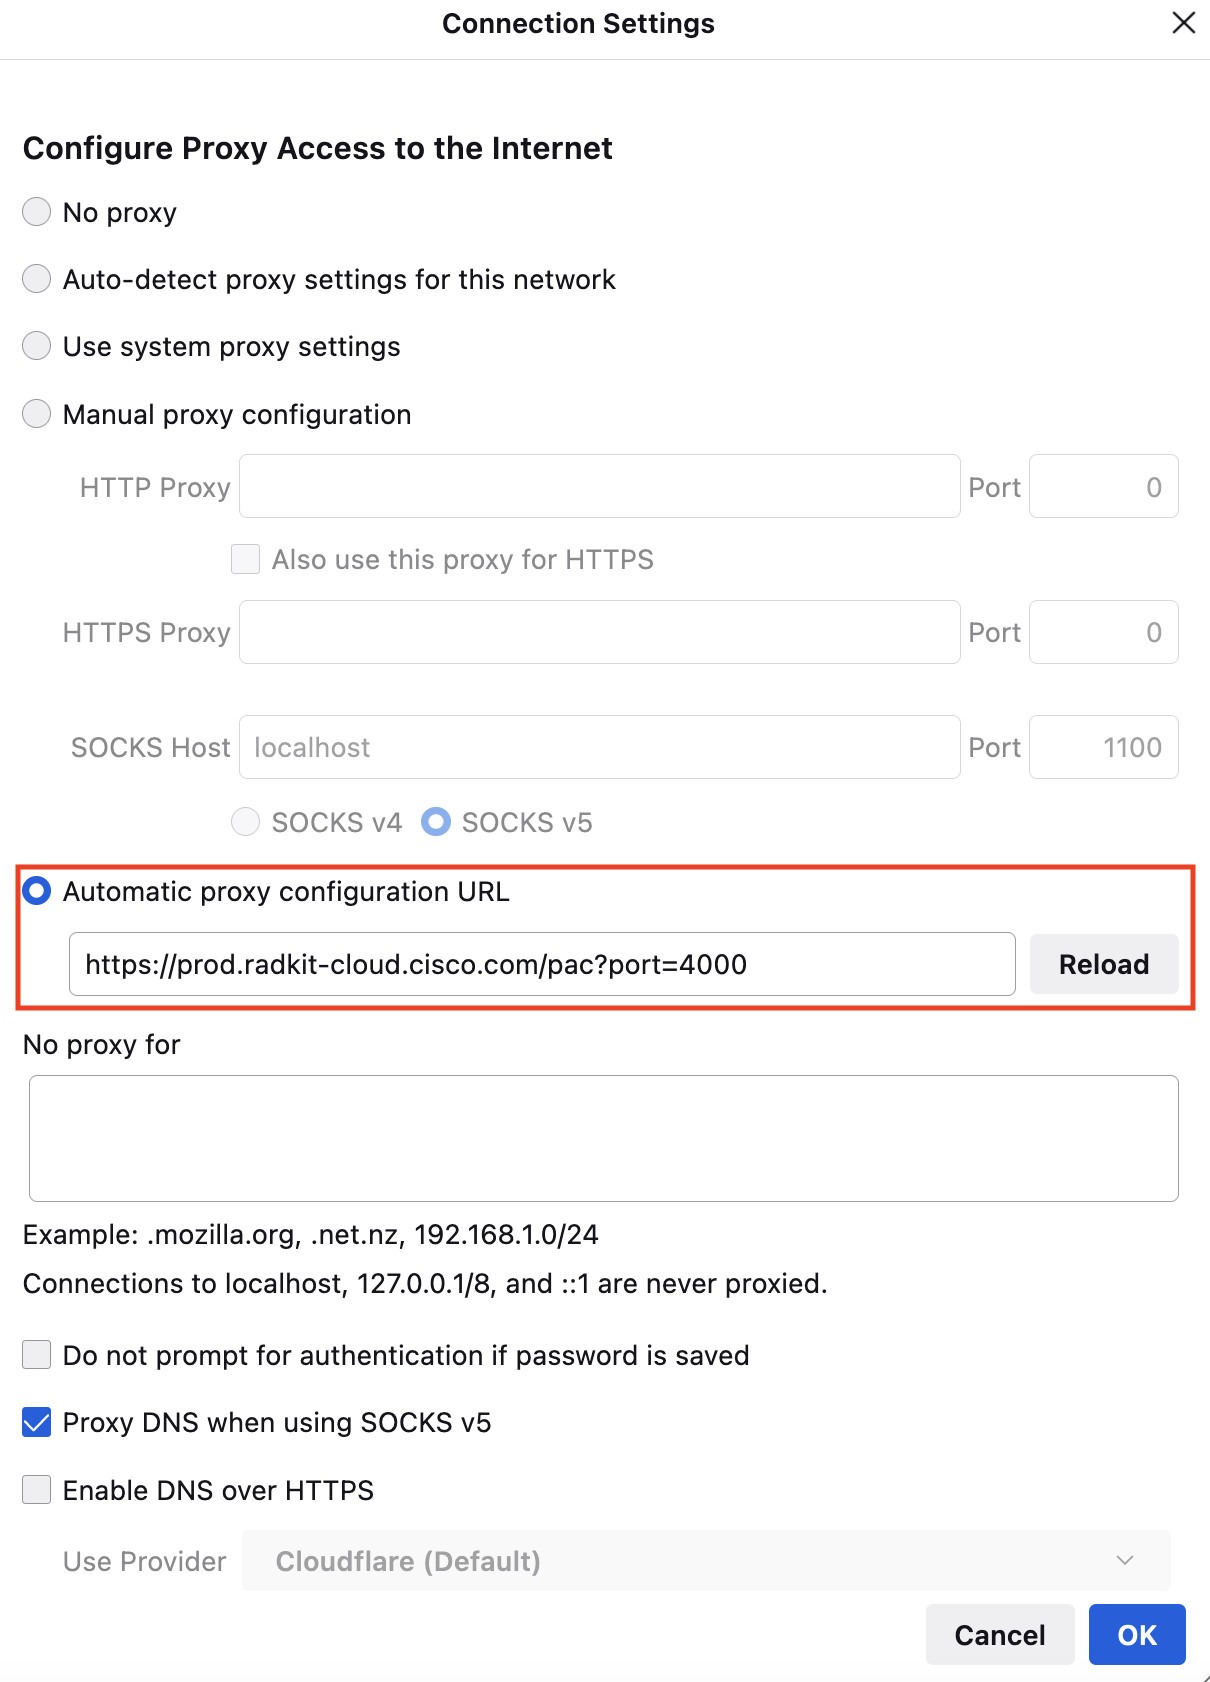
Example 2: (Firefox - PAC file):
PAC file is available under this link: https://prod.radkit-cloud.cisco.com/pac. It accepts two optional query string parameters: browser and port.
By default, the PAC file uses port 4000 and detects the browser automatically.
After establishing connections through the SOCKS5 proxy to a device, you can check the proxy statistics using:
>>> client.socks_proxy
[RUNNING] <radkit_client.sync.port_forwarding.ProxyPortForwarder object at 0x110cd6700>

--------------  --------
status          RUNNING
local_port      4000
#active         2
#failed         6
#closed         11
#total          19
protocol        SOCKS_V5
bytes up        173164
bytes down      16655528
exception       None
--------------  --------
The SOCKS5 proxy can be stopped by calling
Client.stop_socks_proxy().
Alternatively, since the SOCKS5 proxy object is also a
PortForwarder,
it can be controlled in the same way as shown in Controlling port forwarders.
Additionally the SOCKS proxy object provides a dedicated property which lists all the connections grouped by endpoint:
>>> client.socks_proxy.endpoint_connections
<radkit_client.sync.port_forwarding.EndpointConnectionsDict object at 0x1049ceb60>
Tunneled endpoint connections:

endpoint                          #active    #failed    #closed    #total
--------------------------------  ---------  ---------  ---------  --------
test-vm.xxxx-yyyy-zzzz.proxy:443  0          2          0          2
And each connection endpoint contains the list of all of the connections started for this particular endpoint:
>>> client.socks_proxy.endpoint_connections['test-vm.xxxx-yyyy-zzzz.proxy:443'].connections
<radkit_client.async_.port_forwarding.ConnectionsDict object at 0x106fbe830>

Connections:

key    uuid                                  endpoint                          status    opened                      closed                      exception
-----  ------------------------------------  --------------------------------  --------  --------------------------  --------------------------  --------------------------------------------------------------------------------
0      72eaae03-33b0-4859-80f5-c815483c5724  test-vm.xxxx-yyyy-zzzz.proxy:443  FAILED    2023-02-15 10:04:54.578336  2023-02-15 10:04:59.752738  Performing action failed: Tunnel fail error: OS error: Connection refused [te...
1      a66804a6-df2c-43d4-97a1-90688259abff  test-vm.xxxx-yyyy-zzzz.proxy:443  FAILED    2023-02-15 10:04:54.830709  2023-02-15 10:05:00.052461  Performing action failed: Tunnel fail error: OS error: Connection refused [te...
HTTP proxy
Similar to the SOCKS proxy, RADKit client can also behave like an HTTP proxy. Start the HTTP proxy like this:
>>> http_proxy = client.start_http_proxy(4001, username="radkit-user", password="sEcret!123")

[RUNNING] <radkit_client.sync.port_forwarding.ProxyPortForwarder object at 0xffff81435fa0>
----------  -------
status      RUNNING
local_port  4001
#active     0
#failed     0
#closed     6
#total      6
protocol    HTTP
bytes up    0
bytes down  0
exception   None
----------  -------

Use http://localhost:4001 as an HTTP proxy in your browser.
Then navigate to: https://index.proxy/
Now, we can use http://localhost:4001 for both the HTTP_PROXY and
HTTPS_PROXY in a web browser. When configured, https://index.proxy
should show the proxy index, similar to the SOCKS proxy.
Like for SOCKS, a PAC file is available for HTTP under this link:
https://prod.radkit-cloud.cisco.com/pac?protocol=HTTP
(same browser and port query-string parameters as the SOCKS5 PAC file above).
The HTTP proxy can be stopped by calling
Client.stop_http_proxy().
Since the HTTP proxy object is also a
PortForwarder,
it can be started, stopped and resumed in the same way as described in
Controlling port forwarders.
After establishing connections through the HTTP proxy, statistics and per-connection
details can be retrieved from client.http_proxy in the same way as for the SOCKS5
proxy. The endpoint_connections property groups connections by endpoint:
>>> client.http_proxy
[RUNNING] <radkit_client.sync.port_forwarding.ProxyPortForwarder object at 0xffff81435fa0>

----------  -------
status      RUNNING
local_port  4001
#active     2
#failed     1
#closed     8
#total      11
protocol    HTTP
bytes up    12048
bytes down  98304
exception   None
----------  -------

>>> client.http_proxy.endpoint_connections
...