RADKit Ansible Collection
The cisco.radkit Ansible collection provides plugins and modules for network automation through Cisco RADKit, enabling secure, scalable remote access to network devices and infrastructure. The collection is available publicly on Ansible Galaxy and GitHub. All items use RADKit’s certificate based authentication mechanism.
⚠️ IMPORTANT: Connection plugins (cisco.radkit.network_cli and cisco.radkit.terminal) are DEPRECATED as of v2.0.0. Use ssh_proxy module with ansible.netcommon.network_cli for network devices and port_forward module for Linux servers.
Requirements
RADKIT 1.8.5 or higher
Python >= 3.10
cisco-radkit-client (installed via pip)
pproxy (if using
http_proxymodule)genie (if using any of the
geniemodules or Ansiblepyatsparsers)pyats (if using any of the
geniemodules or Ansiblepyatsparsers)
Installation
From Ansible Galaxy (Recommended):
ansible-galaxy collection install cisco.radkit
From Git (Development):
ansible-galaxy collection install git+https://github.com/CiscoAandI/cisco.radkit.git --force
From Local Archive:
Install directly from a downloaded tar file (available in RADKIT downloads area):
ansible-galaxy collection install cisco-radkit-<version>.tar.gz
Using the collection
⚠️ MIGRATION NOTICE: As of v2.0.0, the recommended approach has changed:
For Network Devices (Recommended):
- Use ssh_proxy module with standard ansible.netcommon.network_cli connection
- Device credentials remain on RADKit service (more secure)
- Better compatibility with standard Ansible network modules
For Linux Servers (Recommended): - Use port_forward module with standard SSH connection - Full SSH functionality including SCP/SFTP file transfers
Legacy (DEPRECATED): - Connection plugins cisco.radkit.network_cli and cisco.radkit.terminal are deprecated
Inventory plugins can be used by specifying the radkit_devices.yml with -i or –inventory
Modules can be specified in the playbook by name cisco.radkit.<module name>
All modules and plugins require that cisco-radkit-client be installed via pip along with certificate based authentication.
RADKit Authentication
For Ansible to utilize the certificate-based authentication mechanism, either configure standard environment variables or Ansible vars.
Environment Variables are the preferred method as they work with connections plugins, inventory plugins, and modules:
export RADKIT_ANSIBLE_CLIENT_PRIVATE_KEY_PASSWORD_BASE64=$(echo -n 'mypassword' | base64)
export RADKIT_ANSIBLE_IDENTITY="myuserid@cisco.com"
export RADKIT_ANSIBLE_SERVICE_SERIAL="xxxx-xxx-xxxx"
Alternatively, you can utilize a vars_file to import the authentication variables into your playbook directly. Be sure to encrypt it with ansible-vault!
First, define a yaml file (radkit-vars.yml) where you can specify your RADKIT variables:
---
radkit_service_serial: xxxx-xxx-xxxx
radkit_client_private_key_password_base64: bXlwYXNzd29yZA==
radkit_identity: myuserid@cisco.com
Then, link the radkit-vars.yml to your playbook under vars_files:
- hosts: all
  vars_files:
    - radkit-vars.yml
  gather_facts: no
  tasks:
    - name: Run Command on router1
      cisco.radkit.command:
        service_serial: "{{ radkit_service_serial }}"
        client_key_password_b64: "{{ radkit_client_private_key_password_base64 }}"
        identity: "{{ radkit_identity }}"
        device_name: router1
        command: show version
      register: cmd_output
      delegate_to: localhost
Connection Plugins vs Modules vs Inventory Plugins
⚠️ IMPORTANT: Connection plugins are DEPRECATED as of v2.0.0
Recommended Architecture (v2.0.0+):
For Network Devices (Routers, Switches, Firewalls):
✅ Recommended: ssh_proxy module + standard
ansible.netcommon.network_cliBenefits: - Device credentials remain on RADKit service (more secure) - Standard Ansible network modules work seamlessly - Better performance and compatibility
For Linux Servers:
✅ Recommended: port_forward module + standard SSH
Benefits: - Full SSH functionality including SCP/SFTP file transfers - Works with all standard Ansible modules - More reliable than SSH proxy for Linux hosts
Legacy Support (DEPRECATED):
Connection Plugins allow you to utilize existing Ansible modules but connect through RADKIT instead of directly via SSH. With connection plugins, credentials to devices are stored on the remote RADKit service.
cisco.radkit.network_cli – DEPRECATED: Use ssh_proxy module instead
cisco.radkit.terminal – DEPRECATED: Use port_forward module instead
Modules are specific tasks built upon RADKit functions. The SSH Proxy and Port Forward modules allow you to utilize nearly any existing ansible module with better security and compatibility.
Inventory plugins allow you pull devices from the remote RADKIT service into your local Ansible inventory without manually building an inventory file.
Troubleshooting & Known Issues
Network Device Issues
wait_for_connection not supported: Use cisco.radkit.exec_and_wait instead:
- name: Reload device and wait for recovery
  cisco.radkit.exec_and_wait:
    device_name: "{{ inventory_hostname }}"
    commands: ["reload"]
    prompts: [".*yes/no].*", ".*confirm].*"]
    answers: ["yes\r", "\r"]
    seconds_to_wait: 300
    delay_before_check: 10
  register: reload_result

- name: Reset connection after reload
  meta: reset_connection
High fork errors: When using many concurrent connections:
Increase timeouts in
ansible.cfgReduce fork count:
ansible-playbook -f 10 playbook.ymlUse
port_forwardmodule if device credentials are available
“RADKIT failure:” with empty error message: This usually indicates:
Missing RADKit Client: Install with
pip install cisco-radkit-clientInvalid Credentials: Check your environment variables
Certificate Issues: Verify radkit certificate paths, expiration, and permissions
Network Connectivity: Ensure access to RADKit cloud services
Service Serial: Confirm the service serial is correct and active
Run with -vvv for detailed debugging information.
Platform-Specific Issues
macOS “Dead Worker” Error:
export no_proxy='*'
export OBJC_DISABLE_INITIALIZE_FORK_SAFETY=YES
Note: Incompatible with HTTP Proxy module
Linux Requirements:
Terminal connection plugin requires passwordless sudo
Add to
/etc/sudoers:username ALL=(ALL:ALL) NOPASSWD:ALL
Inventory Plugin
The cisco.radkit.radkit inventory plugin allows you to create a dynamic inventory from a remote RADKit service.
Set the required environment variables (RADKIT_ANSIBLE_CLIENT_PRIVATE_KEY_PASSWORD_BASE64, RADKIT_ANSIBLE_IDENTITY, RADKIT_ANSIBLE_SERVICE_SERIAL)
Create the file: radkit_devices.yml
plugin: cisco.radkit.radkit
strict: False
keyed_groups:
# group devices based on device type (ex radkit_device_type_IOS)
- prefix: radkit_device_type
    key: 'device_type'
# group devices based on description
- prefix: radkit_description
    key: 'description'
Test inventory with the command ansible-inventory -i radkit_devices.yml –list -vvvv
Example:
$ ansible-inventory -i radkit_devices.yml --list --yaml -vvvv
ansible-inventory [core 2.14.1]
<truncated>
Using inventory plugin 'ansible_collections.cisco.radkit.plugins.inventory.radkit' to process inventory source '/Users/myuserid/Documents/cisco.radkit/radkit_devices.yml'
Making a RADKIT certificate_login ... identity=myuserid@cisco.com
RADKIT connection successful, connecting to service xxxx-xxxx-xxxx
Successfully connected to serial xxxx-xxxx-xxxx, getting inventory..
Parsed /Users/myuserid/Documents/cisco.radkit/radkit_devices.yml inventory source with auto plugin
all:
children:
    radkit_device_type_CiscoDNACenter:
    hosts:
        sandboxdnac:
        ansible_host: sandboxdnac.cisco.com
        radkit_device_type: CATALYST_CENTER
        radkit_forwarded_tcp_ports: '443'
        radkit_proxy_dn: sandboxdnac.xxxx-xxxx-xxxx.proxy
    radkit_device_type_IOS:
    hosts:
        rtr-csr1:
        ansible_host: 14.3.68.61
        radkit_device_type: IOS_XE
        radkit_forwarded_tcp_ports: 80;443;22
        radkit_proxy_dn: rtr-csr1.xxxx-xxxx-xxxx.proxy
        rtr-csr2:
        ansible_host: 14.3.68.62
        radkit_device_type: IOS_XE
        radkit_forwarded_tcp_ports: 22;443
        radkit_proxy_dn: rtr-csr2.xxxx-xxxx-xxxx.proxy
    <truncated>
If testing is successful, you can use the inventory with ansible-playbook.
Connection Plugins (DEPRECATED)
⚠️ DEPRECATED: Connection plugins are deprecated as of v2.0.0. Use ssh_proxy and port_forward modules instead.
Connection Plugins allow you to utilize existing Ansible modules, but connect through RADKIT instead of directly via SSH. With connection plugins, credentials to devices are stored on the remote RADKit service. There are currently two connection plugins:
cisco.radkit.network_cli – DEPRECATED: Network_cli plugin is used for network devices with existing Ansible modules. Use
ssh_proxymodule instead.cisco.radkit.terminal – DEPRECATED: Terminal plugin is used for non networking devices (LINUX) with existing SSH based modules. Use
port_forwardmodule instead.
Legacy Example (For Reference Only):
To use the network_cli connection plugin:
Set the required environment variables (RADKIT_ANSIBLE_CLIENT_PRIVATE_KEY_PASSWORD_BASE64, RADKIT_ANSIBLE_IDENTITY, RADKIT_ANSIBLE_SERVICE_SERIAL)
Change the connection plugin by either adding “connection: cisco.radkit.network_cli” to your playbook or by setting the ansible_connection variable.
Run your network playbook as normal! Remember that device credentials are all stored the remote within RADKit service and never exposed!
Example:
# Setting variables
$ export RADKIT_ANSIBLE_CLIENT_PRIVATE_KEY_PASSWORD_BASE64=$(echo -n 'mypassword' | base64)
$ export RADKIT_ANSIBLE_IDENTITY="myuserid@cisco.com"
$ export RADKIT_ANSIBLE_SERVICE_SERIAL="xxxx-xxx-xxxx"

# Creating a really basic playbook
$ cat > example-playbook.yml<< EOF
>
> ---
> - hosts: all
>   connection: cisco.radkit.network_cli
>   vars:
>     ansible_network_os: ios
>   gather_facts: no
>   tasks:
>     - name: Run show version and parse
>       ansible.utils.cli_parse:
>         command: "show version"
>         parser:
>           name: ansible.netcommon.pyats
>         set_fact: versions_fact
>
>     - name: Show version info
>       debug:
>         msg: "The OS is {{ versions_fact.version.os }} and the version is {{ versions_fact.version.version }}"
> EOF
$

# Running the playbook
$ ansible-playbook -i radkit_devices.yml example-playbook.yml --limit rtr-csr1

PLAY [all] ***************************************************************************************************************************************************************************************************

TASK [Run show version and parse] ****************************************************************************************************************************************************************************
Friday 13 January 2023  15:26:42 -0500 (0:00:00.020)       0:00:00.020 ********
ok: [rtr-csr1]

TASK [Show version info] *************************************************************************************************************************************************************************************
Friday 13 January 2023  15:26:58 -0500 (0:00:15.921)       0:00:15.941 ********
ok: [rtr-csr1] => {
    "msg": "The OS is IOS-XE and the version is 16.9.1"
}

PLAY RECAP ***************************************************************************************************************************************************************************************************
rtr-csr1                   : ok=2    changed=0    unreachable=0    failed=0    skipped=0    rescued=0    ignored=0

Friday 13 January 2023  15:26:59 -0500 (0:00:01.169)       0:00:17.111 ********
===============================================================================
Run show version and parse --------------------------------------------------------------------------------------------------------------------------------------------------------------------------- 15.92s
Show version info ------------------------------------------------------------------------------------------------------------------------------------------------------------------------------------- 1.17s
$
Modules
Modules are specific tasks built upon RADKit functions. The current modules include:
cisco.radkit.command – Execute commands on network devices via Cisco RADKit
cisco.radkit.controlapi_device – Manage devices in RADKit inventory via Control API
cisco.radkit.exec_and_wait – Executes commands on devices using RADKit and handles interactive prompts
cisco.radkit.genie_diff – This module compares the results across multiple devices and outputs the differences
cisco.radkit.genie_learn – Runs a command via RADKit, then through genie parser, returning a parsed result
cisco.radkit.genie_parsed_command – Runs a command via RADKit, then through genie parser, returning a parsed result
cisco.radkit.http – Execute HTTP/HTTPS requests on devices via Cisco RADKit
cisco.radkit.http_proxy – Starts a local HTTP (and SOCKS) proxy through RADKIT for use with modules that can utilize a proxy
cisco.radkit.port_forward – Forwards a port on a device in RADKIT inventory to localhost port
cisco.radkit.put_file – Uploads a file to a remote device using SCP or SFTP via RADKit
cisco.radkit.service_info – Retrieve RADKit service information and status
cisco.radkit.snmp – Perform SNMP operations via RADKit
cisco.radkit.ssh_proxy – Starts an SSH server proxy to access devices in RADKIT inventory via SSH (recommended for network devices)
cisco.radkit.swagger – Interacts with Swagger/OpenAPI endpoints via RADKit
Details of each module can be obtained by utilizing the ansible-doc cisco.radkit.<module> command
$ ansible-doc cisco.radkit.ssh_proxy
SSH Proxy Module Details
The cisco.radkit.ssh_proxy module is the recommended approach for connecting to network devices as of v2.0.0, if not using modules like cisco.radkit.command or cisco.radkit.genie_parsed_command.
It creates a local SSH proxy server that allows you to connect to multiple RADKit devices through a single proxy instance.
Key Features:
Single Proxy for Multiple Devices: One SSH proxy instance can handle connections to all devices in your RADKit service
Secure Authentication: Device credentials remain on the RADKit service and are never exposed locally
Standard Ansible Compatibility: Works seamlessly with
ansible.netcommon.network_cliand all standard Ansible network modulesUsername Format: Connect using
<device_hostname>@<service_serial>as the SSH usernameLong-Running Process: Designed to run as a background service during playbook execution
How SSH Proxy Works:
Start Proxy: The
ssh_proxymodule starts a local SSH serverDevice Mapping: RADKit maps device hostnames to actual device connections
Authentication: RADKit service handles device authentication automatically
Connection: Ansible connects to
localhost:<radkit_ssh_proxy_port>using device-specific usernames
Important Configuration Notes:
Device hostnames in inventory must match device names in your RADKit service
Use
ansible_host: 127.0.0.1to connect through the proxySet
ansible_portto match your SSH proxy port (e.g., 2225)Disable SSH host key checking (keys change between sessions)
Use
asyncandpoll: 0to keep proxy running during playbook execution
Example SSH Proxy Setup:
- name: Start SSH Proxy
  cisco.radkit.ssh_proxy:
    local_port: 2225
    # Optional: specify service_serial if not using env vars
    # service_serial: "{{ lookup('env', 'RADKIT_ANSIBLE_SERVICE_SERIAL') }}"
  async: 300  # Keep running for 5 minutes
  poll: 0
  register: ssh_proxy_job

- name: Wait for proxy to be ready
  ansible.builtin.wait_for:
    port: 2225
    host: 127.0.0.1
    delay: 3
    timeout: 30
SSH Proxy vs Other Methods:
vs Connection Plugins: More reliable, better compatibility, future-proof
vs Port Forward: Better for network devices, handles multiple devices efficiently
vs Direct Command Modules: Allows use of any existing Ansible network module
📖 Learn More: SSH Forwarding Documentation
Quick Start Examples
Network Device Example (SSH Proxy - Recommended):
---
- name: Setup RADKit SSH Proxy
  hosts: localhost
  become: no
  gather_facts: no
  vars:
    ssh_proxy_port: 2225
  tasks:
    - name: Start RADKit SSH Proxy Server
      cisco.radkit.ssh_proxy:
        local_port: "{{ ssh_proxy_port }}"
      async: 300
      poll: 0

    - name: Wait for SSH proxy to become available
      ansible.builtin.wait_for:
        port: "{{ ssh_proxy_port }}"
        host: 127.0.0.1
        delay: 3
        timeout: 30

- name: Execute commands on network devices
  hosts: cisco_devices
  become: no
  gather_facts: no
  connection: ansible.netcommon.network_cli
  vars:
    ansible_network_os: ios
    ansible_host: 127.0.0.1
    ansible_port: 2225
    ansible_user: "{{ inventory_hostname }}@{{ lookup('env', 'RADKIT_ANSIBLE_SERVICE_SERIAL') }}"
    ansible_host_key_checking: false
  tasks:
    - name: Get device version information
      cisco.ios.ios_command:
        commands: show version
      register: version_info
Linux Server Example (Port Forward):
- hosts: localhost
  vars:
    target_server: "linux-server-01"
  tasks:
    - name: Start port forward
      cisco.radkit.port_forward:
        device_name: "{{ target_server }}"
        remote_port: 22
        local_port: 2223
      register: port_forward_result

    - name: Wait for port forward to be ready
      ansible.builtin.wait_for:
        port: 2223
        delay: 3

    - name: Connect to Linux server via port forward
      vars:
        ansible_host: localhost
        ansible_port: 2223
        ansible_host_key_checking: false
      block:
        - name: Get system information
          ansible.builtin.setup:
          register: system_facts
Port Forward Module Details
The port forward ansible module is special for its versatility in allowing nearly any Ansible module to utilize RADKit. For example, you can use the cisco.aci collection just by changing the port number. Or you can connect to devices through RADKit directly through Ansible’s native OpenSSH connection. The trick works by running RADkit in the background as an async task.
Important Notes for Port Forwarding:
Ensure that the async timeout is longer than the expected ansible-playbook runtime
The forwarded port must be configured for the device in the RADKit service
Credentials to the device must be fed into Ansible as if making a direct connection (credentials stored in the remote RADKit service are NOT used)
Use
ssh_proxyfor network devices,port_forwardfor Linux servers
For detailed port forwarding examples, see the collection documentation.
Ansible Automation Controller (Ansible Tower/AWX)
The cisco.radkit collection can be used with Ansible AWX/Tower. In order to utilize AWX/Tower with cisco.radkit:
Create an Ansible execution environment that contains the cisco.radkit collection
Export the RADKit client certificates from a working Installation
(You can find your certificates in the path ~/.radkit/certificate_bundles/prod.radkit-cloud.cisco.com/client/userid@cisco.com.)
Configure a custom credential type in AWX/Tower
Create a credential per RADKit serial
Align the credential to a template
Creating An Execution Environment
To create an execution environment that contains RADKit and the cisco.radkit collection, do the following:
Prerequisites:
Install ansible-builder
pip install ansible-builder
Steps:
Make a directory to hold the execution build files.
mkdir ee
Enter directory.
cd ee
Create build context directory:
mkdir -p context/_build
Create requirements.yml. Add any other ansible collections deemed necessary:
cat > requirements.yml<< EOF
collections:
- name: cisco.radkit
- name: ansible.netcommon
- name: cisco.aci
- name: cisco.asa
- name: cisco.dnac
- name: cisco.intersight
- name: cisco.ios
- name: cisco.iosxr
- name: cisco.ise
- name: cisco.meraki
- name: cisco.mso
- name: cisco.nso
- name: cisco.nxos
EOF
Create requirements.txt. Add any other python requirements necessary:
cat > requirements.txt<< EOF
cisco-radkit-client
pproxy
pyats
genie
requests
EOF
Create execution-environment.yml:
cat > execution-environment.yml<< EOF
---
version: 1
dependencies:
  galaxy: requirements.yml
  python: requirements.txt
additional_build_steps:
  prepend: |
    RUN pip3 install --upgrade pip
    RUN pip3 install --upgrade pyopenssl
  append: |
    RUN pip3 install --upgrade ansible-runner
EOF
Build the EE:
ansible-builder build --tag radkit_ee --container-runtime docker --build-arg EE_BASE_IMAGE=quay.io/ansible/ansible-runner:latest -v 3 --no-cache
Retag image if necessary:
docker image tag radkit_ee:latest your-registry/radkit_ee:2.0
Configuring Ansible Tower
Adding An Execution Environment to AWX
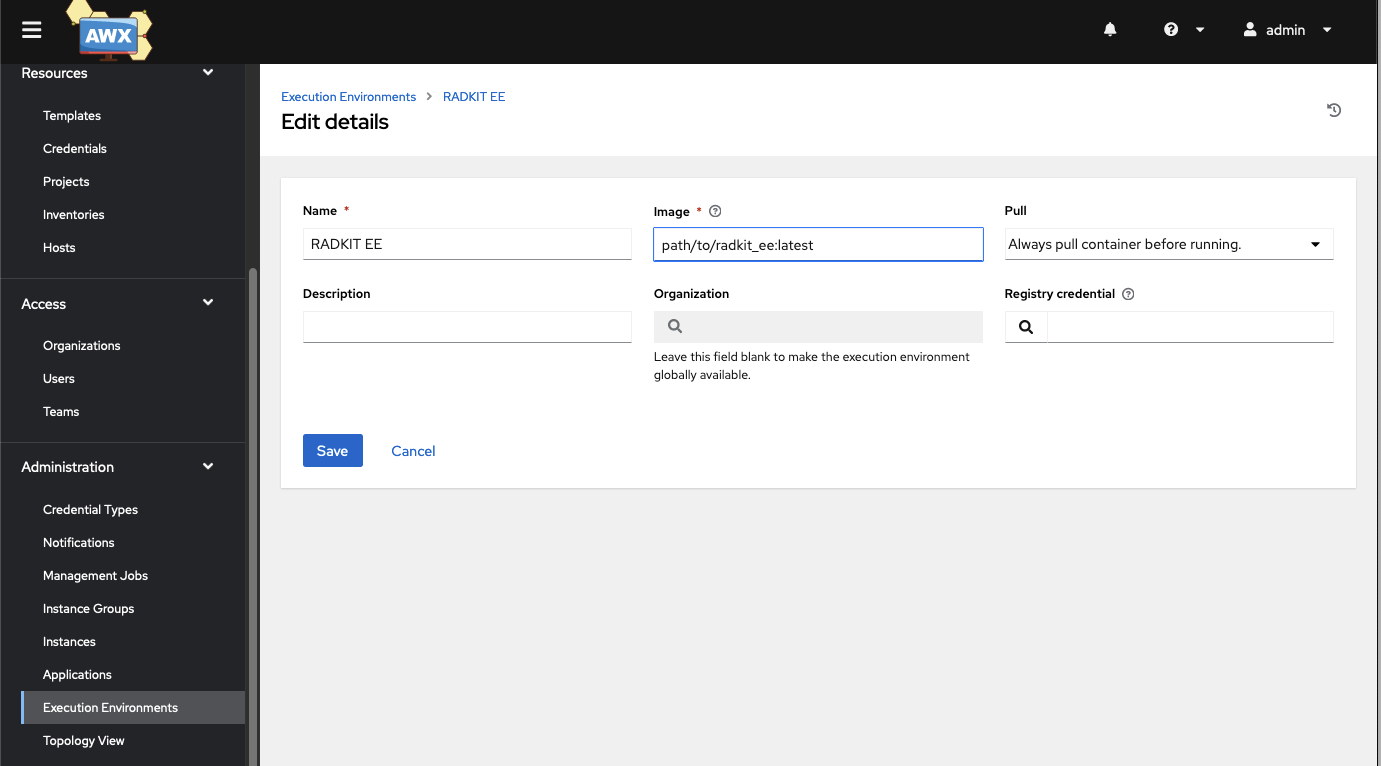
Add an execution environment that contains RADKit and the cisco.radkit collection.
Login to AWX/Tower
Navigate to Execution Environment
Click Add
Fill in path to execution environment that contains the radkit EE
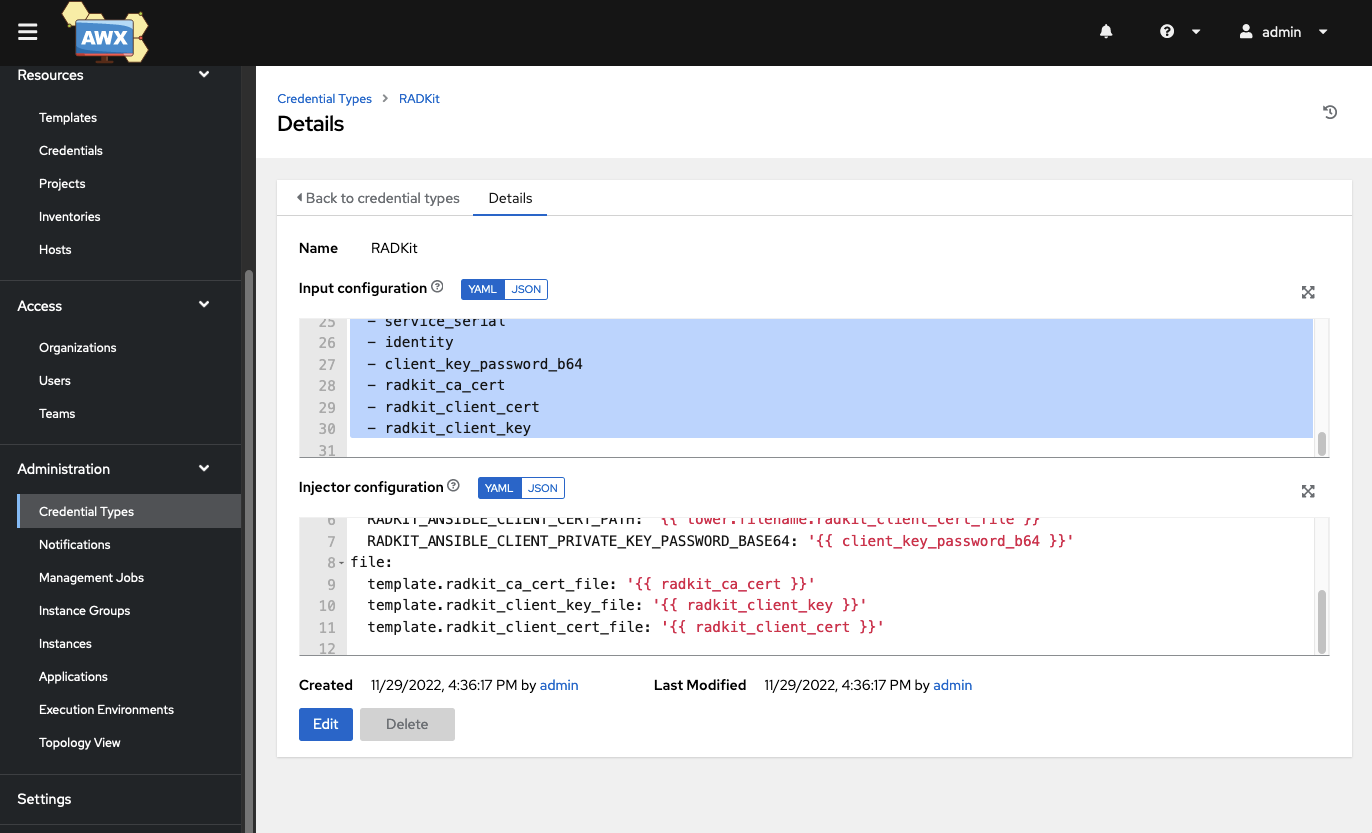
Adding Credential Type to AWX
Create a custom credential type so that users can add the RADkit client certificates into AWX/Tower.
Login to AWX/Tower
Navigate to Credential Types
Click Add
Name it “Radkit”
Fill in the Input configuration
fields:
  - id: identity
    type: string
    label: Identity
  - id: client_key_password_b64
    type: string
    label: Client Key Password Base64
    secret: true
  - id: service_serial
    type: string
    label: RADKit Service Serial
  - id: radkit_ca_cert
    type: string
    label: RADKit CA Cert
    multiline: true
  - id: radkit_client_cert
    type: string
    label: RADKit Client Certificate
    multiline: true
  - id: radkit_client_key
    type: string
    label: RADKit Client Key
    multiline: true
required:
  - service_serial
  - identity
  - client_key_password_b64
  - radkit_ca_cert
  - radkit_client_cert
  - radkit_client_key
Fill in the Injector configuration
env:
  RADKIT_ANSIBLE_IDENTITY: '{{ identity }}'
  RADKIT_ANSIBLE_CLIENT_CA_PATH: '{{ tower.filename.radkit_ca_cert_file }}'
  RADKIT_ANSIBLE_SERVICE_SERIAL: '{{ service_serial }}'
  RADKIT_ANSIBLE_CLIENT_KEY_PATH: '{{ tower.filename.radkit_client_key_file }}'
  RADKIT_ANSIBLE_CLIENT_CERT_PATH: '{{ tower.filename.radkit_client_cert_file }}'
  RADKIT_ANSIBLE_CLIENT_PRIVATE_KEY_PASSWORD_BASE64: '{{ client_key_password_b64 }}'
file:
  template.radkit_ca_cert_file: '{{ radkit_ca_cert }}'
  template.radkit_client_key_file: '{{ radkit_client_key }}'
  template.radkit_client_cert_file: '{{ radkit_client_cert }}'
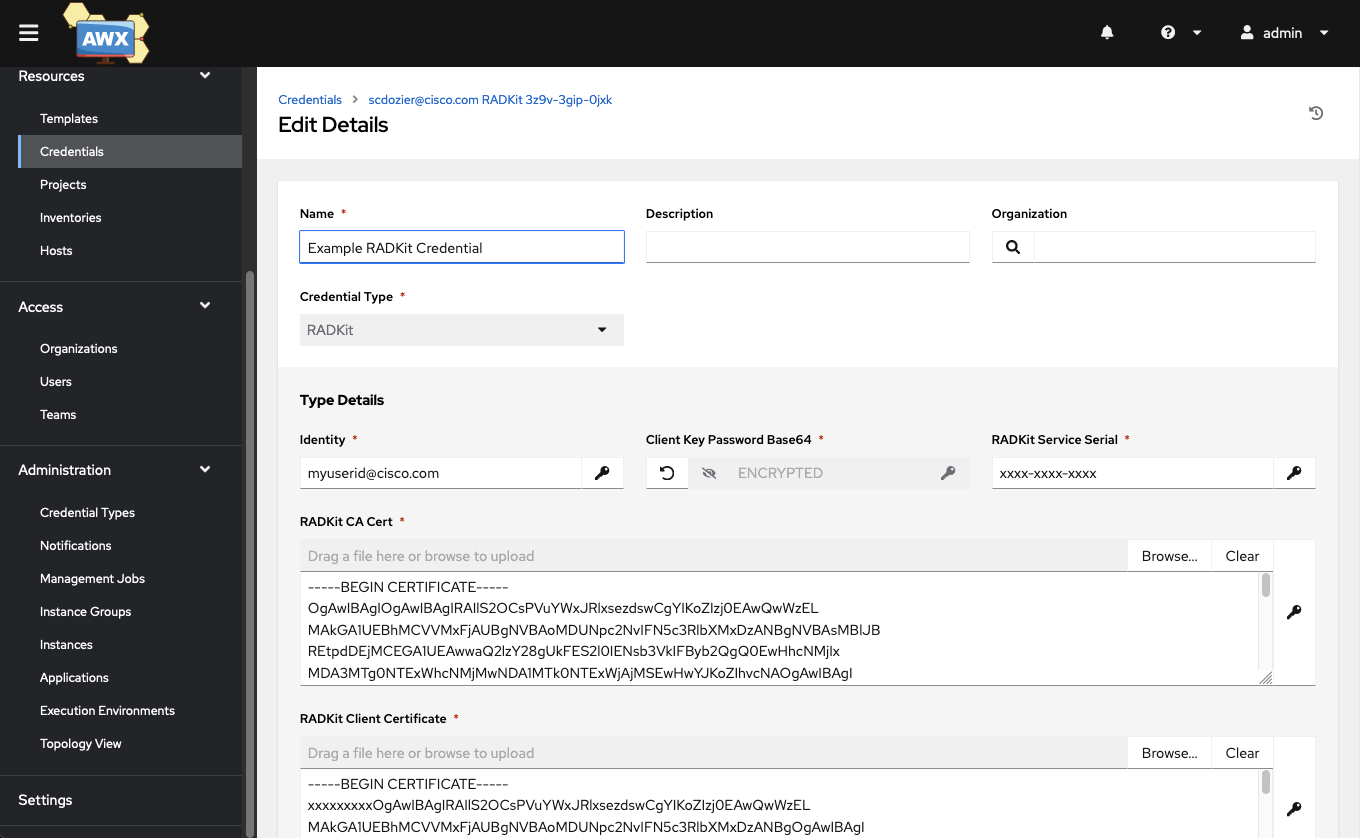
Creating A Radkit Credential In AWX
Create a redential in AWX for every RADKit serial and user.
Login to AWX/Tower
Navigate to Credentials
Click Add
Set the credential type to RADKIT
Fill in required fields. Copying PEM format RADKit client certificates into the certificate fields.
Aligning A Credential to Templates in AWX
As a final step, align created RADkit credentials to any AWX/Tower template that you wish to utilize with RADkit.
Links & Resources
RADKit Documentation: radkit.cisco.com
Ansible Galaxy Collection: cisco.radkit
GitHub Repository: CiscoAandI/cisco.radkit
PyPI Package: cisco-radkit-client
Certificate Setup: Authentication Guide
SSH Forwarding: Feature Documentation
Port Forwarding: Feature Documentation
For detailed examples and advanced configurations, see the collection documentation and playbook examples.